Remote Learning – Web Browser Tabs

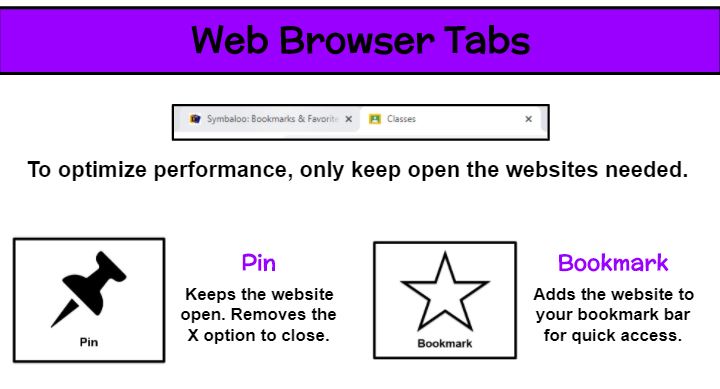
A technology device works its best when the fewest amount of applications are running. So students who have a dozen websites open (some of which may be games or videos that strain the computer and pose possible distractions during instruction) could experience issues with their video call. Explain the importance of minimizing open applications. In my remote classroom, we use Google Chrome and students start the day with just our district Symbaloo and Google Classroom tabs. They are reminded to X out of any others such as the tab that launched our Zoom meeting. As our morning progresses, additional pages may be needed. But as we finish with those websites, students are instructed to close them.

To avoid the accidental closure of a needed tab, I teach students how to pin and bookmark sites as well as the difference in their uses. By right clicking on a website tab, the Pin option (push pin icon) keeps the site open. In fact, it removes the X completely. In order to close it now, the user must right click on the tab again and select Unpin to view the X. I highly encourage pinning a website when students are taking an assessment. Although some tasks may be autosaved and allow the student to pick up where they left off, pinning will help you avoid those scares. The Bookmark option (star icon) is used to collect often used sites in a list. Those appear in a bar along the top of your browser and additional ones can be located by clicking on the >> at the end of the row. Users can rename bookmarked sites by right clicking and editing or rearrange them by clicking the title and dragging it to a new spot on the bar.

Remote Learning – Welcome & Prep

Joining a virtual meeting always gives me a little bit of jitters. It’s the unknown. The awkward silence. The repeated directions. The waiting. It can be agitating. And I want to be calm, ready to learn when I join a meeting. While attending an online summer class, one instructor gave me a few ideas that I immediately knew I was going to use with my students. First, a template page with written welcome and directions. Second, a task to reflect on current feelings. Third, music. The name of the course was “Brain-based Learning,” go figure . . . she was using brain research from the moment we joined the call.

From day one, I put up a welcome page for students to see as they entered my meeting. I also had my Amazon Music “Mrs. Foley’s Playlist” on. Part of the reason for music is to give the brain something nice to listen to, but also it gave the kids an chance to check/adjust their sound. My page gave reminders about materials needed. In the chat I asked students to share a weekend highlight, describe how they are feeling in 2 words, set a daily goal, review a skill from a previous lesson (type a multiple of 9 fact with the product), etc.

This gave me time to take silent attendance and assist students with tech issues. The others weren’t bored or annoyed (hopefully) during this time. Instead, they were preparing their work space and selves for learning. Plus, it was a daily opportunity for community building because many times the chat questions were personal. The entire “welcome and prep” time is the five minutes before the official start time, so no time is lost, but A LOT of time is gained. We begin right at 9:00 (or 9:01) and have a smooth ride!

Remote Learning – Additional Tools

Communication Paddles
During your remote lessons, do you find it’s difficult to know if a student is volunteering. A raised hand is easy to miss. Avoid the confusion and wasted time by creating two-sided red/green communication paddles for each student. I laminated red and green cardstock circles, taped a jumbo popsicle stick onto one circle, then used a strong tape rolled into cylinders to sandwich on the other circle. Prepping these communication tools in advance will greatly help your students and the flow of your lessons. Be deliberate in using the yes/no paddle. Say, “Paddles ready!” and then ask your yes/no question. Scan your meeting grid to quickly and clearly see responses.

DIY Dry-Erase Boards
If you aren’t fortunate enough to have individual dry-erase boards for every student, make your own! It’s as simple as laminating a sheet of white cardstock. I used my personal laminator and thick laminating sheets to create mine. I love the strength and rounded corners. I also included a thin dry-erase marker and microfiber cloth to use as an eraser. Students can place the laminated sheet on the clipboard I provided for extra support if needed.

Remote Learning – Funding Needs

Teachers often spend their own money on supplies. Whether you are teaching in-person or remotely, it’s likely you will need additional funds to purchase more individual student materials. Sharing in class is not much of an option right now and we can’t assume all students have the necessary at-home learning tools. I wanted all of my students to have exactly what was needed for remote learning, so if it wasn’t provided by the school or local organizations, I sought out other avenues to cover some the cost. Fortunately, I received a generous grant from Thrivent Action Teams. The approval process was quick, and I was able to order everything I still wanted for my class before the start of the year orientation and pick-up. If a grant is hard to come by, consider other methods. I have found creating an Amazon with list, checking with my administrator, asking the parent-teacher organization, soliciting local businesses for donations, and inquiring about educator discounts has paid off in the past.

Remote Learning – Student Materials

Organization 101. Is there a college course for teachers on this? Well, there certainly should be. Being organized is the first step to establishing a well-functioning classroom environment. When I learned that we would start the school year with 100% remote learning, I put all of my initial focus on organization.

I love to color-code everything! I highly suggest selecting a color for each subject and using it for both physical and digital materials. Choosing uniform colors starts with the supplies you are provided, such as workbooks. Since our math workbook is blue, I made the other math materials that color. Since yellow spiral notebooks were provided as a student supply this year, I made all writing materials yellow. The uniform colors will help kids and families categorize content. Magazine files make great subject totes. Remember to use a splash of these colors on your presentation pages to tie it all together. Check out the at-home classroom I provided each of my students for remote learning (3 subject totes, clipboard, dry-erase board with markers and eraser cloth, workbooks, journals, folders with resources, Scholastic News magazines, books, red/green communication paddle, etc.).

Since every students has identical materials, it makes transitions during lessons smoother. No one has a good excuse for not having the item or knowing what/where it is! “In your green reading tote, find your green reader response journal.” Color-coding has maximized my time-on-task with students.

“Where’s Mrs. Foley?” Adventure Videos

When the Covid pandemic began in mid-March, I felt lost. Other than providing a packet of independent work per district directive, I didn’t know what else to do. I really wanted to support my third graders during this uncertain time. So I got the idea of creating a stick-puppet show that delivered encouraging words and challenges. “Where in the World is Mrs. Foley?” was my adventure series and daily 2-4 minute videos were posted every school day — all 40 of them! Each time my character visited a new place around the world (and beyond). I share some facts about the location before the main lesson and challenge. While this project began as a service for my students, I felt it helped me stay productive. The element of creativity was a therapy I really needed. Check out my YouTube playlist of adventures.

Readers’ Theatre – Masterpiece

As our five-week whole-school novel study came to a close, we wanted to celebrate as a community. So again this year we orchestrated a readers’ theatre of the final chapters. My third graders continue to amaze me. And I really challenged them this time! Not only was there acting and instruments, I also added shadow puppetry! We had 3 narrators, 12 musicians, 3 puppeteers, and 7 actors. The addition of the black curtains and frames helped hide the puppeteers and voice actors who played the beetles. I was able to purchase those thanks to a Thrivent Action Teams grant. Oh, and the music teacher and I collaborated on an original song for Masterpiece! I wrote the lyrics and she set it to a melody. Listen to it here. (My 6th-grade daughter played it on her guitar.) The kids played and sang this chorus several times during the play. And since the music teacher taught it to all of her classes the week of our performance, the audience was able to sing along. Our first sing-along play! This was a readers’ theatre with lots of new elements. I absolutely LOVED the challenge and chance to be creative! Finally, every student was surprised with a gift–their very own sketchbook and felt-tip pen, like James in Masterpiece, though he had an ink set. That would have been a little to messy and expensive for all 480 students. Again, a big thanks to a Thrivent Action Teams grant for the purchase of the sketchbooks. What a thrill!

One School, One Book – Masterpiece Shadow Puppets

For the third year in a row, our students participated in an all-school novel study. This year’s title was Masterpiece by Elise Broach. For our opening assembly, the student body was introduced to the characters with a shadow puppet show. Yes! We amateurs pulled off a shadow puppet show of chapter 1 for 500 people. How did we do it? An old overhead projector, white sheet, greenscreen frame, and 2-D paper characters. And, of course, I had to add musical instrument sound effects! Another teacher and I hid behind the screen. I managed the puppets and she added the sounds–one for each character and others as needed. Other staff members joined in on the fun. Our librarian narrated the chapter and our art teacher painted an amazing owl (our mascot) in the style of Durer (the focus artist in the book). Following the assembly, Okie and a Marvin-style cart (the beetle in Masterpiece) made the rounds to each classroom to deliver a stack of novels, one for every student. Isn’t the teacher-created bookmark also adorable! Our team when all out again this year to get kids excited for the “One School, One Book” 5-week adventure.

LittleBits

Little Bit kits are amazing for teaching electrical circuits and engineering, but also provide students with opportunities to wonder and explore. The miniature pieces snap together with a magnetic system. Students start with a power source (electrical cord in an outlet or 9-volt battery) and add on switch (dimmer, pulse, etc.) and mechanical device (fan, buzzer, light, etc.) Once they learn the basics of how the circuit works, kids can take on Little Bit challenges to build all kinds of inventions! I had 4 Little Bits kits to work with 26 students, so I prepped baskets with the materials my groups of 3-4 kids would need along with a direction card I created. Every group needed a power source, and since I had 4 kits that each have a wall outlet or battery, I was able to make 8 baskets. Half of them were Level 1 – Set A challenges with the wall outlet and half of them were Level 1 – Set B challenges with the 9-volt battery. Since it was their first time using these materials, the tasks where outlined for them with simple circuits building up to more intricate ones. When done with the 5 challenges I had set, groups were given time to explore with their pieces. The next time we swapped A and B baskets and investigated more with the new blocks. And for our third experience with Little Bits, teams were given invention challenges. We used the instruction booklets that came with the kits, but the Little Bits website has many resources and project ideas. Get ready for fun!

SMART Monster Lab

SMART Lab has several great game templates (shout out, match, sort, etc.). One that is perfect as a team review game is Monster Lab. I created 10 multiple choice questions for three-digit addition and subtraction. Each student logged onto hellosmart.com and entered his/her name. I had the program randomly sort them into 5 teams. (Teachers have the option of rearranging the members if they want better balance before the challenge starts.) Every student also had a dry-erase board and marker to work out the sums and differences. The kids were so focused during this 15 minutes that you could hear a pin drop! Though there were several quiet bursts of joy when students and saw their team monster begin to burst from the shell with every correct answer. I know they enjoyed this activity a lot because many asked to do it again. So it looks like Monster Lab review games are a winner!